| View previous topic :: View next topic |
| Author |
Message |
antonputman
Joined: 22 May 2014
Posts: 137
Location: North Shore Italy
|
 Posted: Sun Feb 01, 2015 4:12 pm Post subject: Posted: Sun Feb 01, 2015 4:12 pm Post subject: |
 |
|
| isobars wrote: | | I hope you haven't already done that to your board. Those inserts are for full-depth wood, not stryrofoam laminated with a very thin layer of wood or for the narrow blocks used in most production boards. |
No I have not. I want to convert my existing PT screws to machine screws. But like Mark I would need to find out exactly what inserts they have used in my Exocet 10' WindSUP.
Than I would get one of those inserts and do some tests before even thinking to do the job on the board. I guess this also void the warranty...
Anyway, if the plastic is too hard, maybe it is also possible to (lightly) pre-tap the insert so that it can receive the new machine screw insert? |
|
| Back to top |
|
 |
isobars
Joined: 12 Dec 1999
Posts: 20935
|
| Posted: Sun Feb 01, 2015 5:19 pm Post subject: |
|
|
| My concern would be that the inserts' width would weaken the sidewalls of the OEM blocks too much. I'm also not clear on what advantage machine screws have over sheet metal screws in this application. I have both, and don't favor one over the other. Each has its own slight merits. |
|
| Back to top |
|
|
mark
Joined: 10 Apr 2000
Posts: 181
|
| Posted: Sun Feb 01, 2015 6:38 pm Post subject: |
|
|
Foot strap inserts are soft enough to allow threads to be cut when you insert screws so I would not be too concerned about the plastic being too brittle.
The smaller diameter is one of the reasons that the McMaster inserts are appealing. The outside diameter is roughly 7.5mm. The drill pilot hole is .266" (6.7mm) which is not much larger than a 6mm stripped out screw.
The screws also have a slot down the entire side which the literature says is to help clear the plastic chips when installing.
Still I want to know more about the insert thickness before I would drill into the board. |
|
| Back to top |
|
|
skyking1231
Joined: 10 Jul 2000
Posts: 280
|
| Posted: Wed Feb 04, 2015 9:07 pm Post subject: |
|
|
what if you just filled the hole completely with JB weld...let it set...then drill and tap a new hole ?
I have done such a technique before...but not with strap inserts on a WS board... and it worked or still works quite well in my particular situation.... so i wonder if it could work.... hopefully i won't ever have the need to find out
 |
|
| Back to top |
|
|
kevinkan

Joined: 07 Jun 2001
Posts: 1661
Location: San Francisco
|
|
| Back to top |
|
|
thombiz

Joined: 25 Jun 2007
Posts: 799
Location: Corpus Christi
|
| Posted: Sun Feb 08, 2015 8:08 pm Post subject: |
|
|
I tried to drill out then fill hole with JB Weld years ago, but the JB Weld wasn't nearly as strong as the plastic used in the insert so it easily stripped out.
I was glad to see the inserts for use in plastic, available from McMaster-Carr. Those are a better solution than the inserts for wood. |
|
| Back to top |
|
|
danleow
Joined: 12 Aug 2015
Posts: 1
|
| Posted: Wed Aug 12, 2015 9:33 am Post subject: |
|
|
I thought to share my method with everyone on how I repaired my loose board inserts and weak deck. In summary, I cut out the weak deck skin and reinforce the inserts with epoxy resin. I then put 4 layers of fiber mat with epoxy resin as new deck skin. I would have use 2 layers of carbon if I could get any.
I made a detailed vid here https://www.youtube.com/watch?v=DvHKOWngkIQ |
|
| Back to top |
|
|
manuel

Joined: 08 Oct 2007
Posts: 1158
|
| Posted: Fri Aug 14, 2015 8:42 pm Post subject: |
|
|
I had all of the holes from one insert fail, it looked like the plastic was soft on the whole insert. All of the other inserts were fine. It's odd (Starboard 2013) but whatever.
Because Starboard provides big screws to start, it basically pulled out most of the insert matter out and obviously bigger screws cannot be used!
Anyway, after researching online how to fix this without the use of epoxy resin + fiberglass cloth, I gave the wall anchor fix a shot. In short, I made the hole so that I could fit the wall anchor all the way to the bottom of the hole, scraped it to get a rough surface and cleaned with acetone.
Then I used a size larger than the hole wall anchor scuffed with sand paper, sanded the corners a little so it could fit in the hole with the help of a hammer (gently). I applied epoxy glue (only a small amount), fit the wall anchor in all the way to the bottom.
Then I used a small screw to make the thread, but used a big screw to tighten my footstrap. The idea was that the expansion of the anchor would help keep it in too.
Finally, I used a small washer underneath the starboard plastic one to prevent the anchor from riding up during tightening.
After 8 sessions on the setup, nothing has moved one bit. Today was especially hard on it with lots of aggressive onshore clew-first riding.
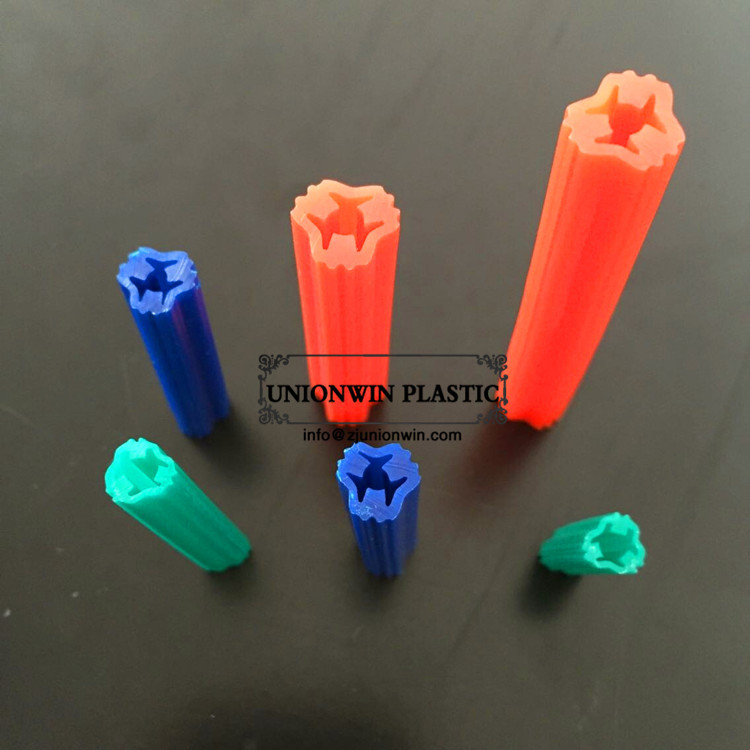
This is the type of anchor I used (the orange one). Needs to be as "cylinder-like" as possible to get the most contact with the insert.
_________________
*NEW* - Manu's Windsurfing Blog, The STORE! |
|
| Back to top |
|
|
|

