| View previous topic :: View next topic |
| Author |
Message |
thombiz

Joined: 25 Jun 2007
Posts: 799
Location: Corpus Christi
|
 Posted: Mon Oct 08, 2018 10:55 am Post subject: How to: Replace a Sail Panel Posted: Mon Oct 08, 2018 10:55 am Post subject: How to: Replace a Sail Panel |
 |
|
PAGE 1 - REPLACING A SAIL PANEL
First hang the sail up & rinse thoroughly. Hang it by attaching a rope to the down haul pulley and tying that to a tree limb or strong support, then another rope to the top strap and tying that to a limb or similar so the sail is off the ground. Rinse fully to remove grass, sand, & salt. When dry, take it down, roll it up and move it to work tables. Unless youre certain the sail is clean, rinse it. Sand and salt can damage sensitive sewing machine parts.
| Description: |
|
| Filesize: |
297.38 KB |
| Viewed: |
20213 Time(s) |

|
Last edited by thombiz on Mon Oct 08, 2018 2:24 pm; edited 1 time in total |
|
| Back to top |
|
 |
thombiz
Joined: 25 Jun 2007
Posts: 799
Location: Corpus Christi
|
| Posted: Mon Oct 08, 2018 11:03 am Post subject: |
|
|
PAGE 2 - Replacing a Sail Panel
My work tables consist of 4 banquet tables purchased from Home Depot. I unroll the sail on the tables and remove the battens at the top & bottom of the panel to be replaced. This relieves the tension on the damaged panel so the tear can be taped back together.
| Description: |
|
| Filesize: |
92.57 KB |
| Viewed: |
20208 Time(s) |

|
Last edited by thombiz on Mon Oct 08, 2018 3:59 pm; edited 2 times in total |
|
| Back to top |
|
|
thombiz
Joined: 25 Jun 2007
Posts: 799
Location: Corpus Christi
|
| Posted: Mon Oct 08, 2018 11:03 am Post subject: |
|
|
PAGE 3 - Replacing a Sail Panel
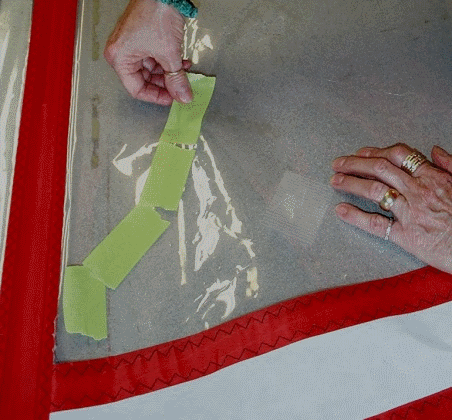
Next, tape the tear back together being very careful to exactly match up the edges. In this example Ive used short pieces of green tape because it photographs better than the packing tape I normally use. Using pieces about 4 long lessens the possibility of miss-aligning the edges. Try to keep the panel very flat during this process. Here is the panel taped. Some torn monofilm is missing, so I taped what I could. Again, I used green tape because it photos better than clear tape. Clear tape holds better.
| Description: |
|
| Filesize: |
91.91 KB |
| Viewed: |
20200 Time(s) |
|
Last edited by thombiz on Mon Oct 08, 2018 5:40 pm; edited 2 times in total |
|
| Back to top |
|
|
thombiz
Joined: 25 Jun 2007
Posts: 799
Location: Corpus Christi
|
| Posted: Mon Oct 08, 2018 11:18 am Post subject: |
|
|
PAGE 4 - Repairing a Sail Panel
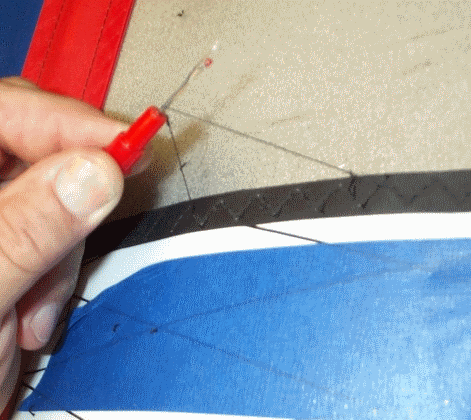
With the tear taped, I use a seam ripper to take out some stitching at the perimeter of the panel to be replaced. Sails usually have a front side and a back side. I refer to the side with the batten pocket attached to it as the front side. The side with only the fabric cover I refer to as the back side. I find it is easier to take out the stitching using a seam ripper on the back side because the stitching stands up just a bit more.
For convenience I have used blue tape to show you the area where stitching will need to be removed. You wont need to put blue tape on your sail. I remove only the stitches which hold the panel in place plus the stitches at the flutter batten. Ill start with the lower batten pocket. I only want to remove the ZIGZAG stitches inside the taped blue boundary.
Last edited by thombiz on Mon Oct 08, 2018 3:59 pm; edited 1 time in total |
|
| Back to top |
|
|
thombiz
Joined: 25 Jun 2007
Posts: 799
Location: Corpus Christi
|
| Posted: Mon Oct 08, 2018 11:19 am Post subject: |
|
|
Page 5 - Replacing a Sail Panel
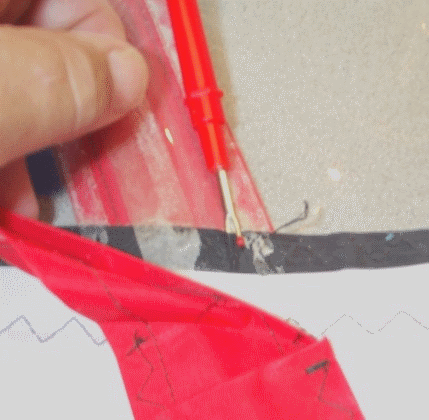
Carefully flip the sail over so the back side is up and start cutting the stitches as shown with the seam ripper. I have used BLUE TAPE to mark the boundaries of the work to be performed.
| Description: |
|
| Filesize: |
96.98 KB |
| Viewed: |
20185 Time(s) |

|
| Description: |
|
| Filesize: |
77.95 KB |
| Viewed: |
20185 Time(s) |

|
Last edited by thombiz on Mon Oct 08, 2018 11:30 am; edited 3 times in total |
|
| Back to top |
|
|
thombiz
Joined: 25 Jun 2007
Posts: 799
Location: Corpus Christi
|
| Posted: Mon Oct 08, 2018 11:19 am Post subject: |
|
|
Page 6 - Replacing a Sail Panel
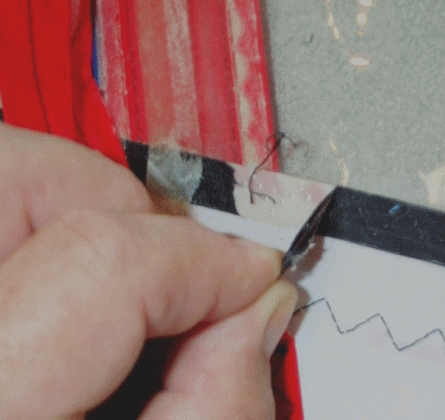
Next, I usually cut the batten pocket stitches then cut the stitches at the leading and trailing edges of the panel to be removed. I also cut the stitches at the flutter batten. Next, flip the sail over so the front side is up. Take the seam ripper and lift up the intact thread as shown.
Grab the thread with your free hand and pull up from one end of the panel to the other. Do the same on the remaining seams of the panel to be replaced.
| Description: |
|
| Filesize: |
75.26 KB |
| Viewed: |
20167 Time(s) |

|
| Description: |
|
| Filesize: |
77.05 KB |
| Viewed: |
20180 Time(s) |
|
Last edited by thombiz on Mon Oct 08, 2018 4:00 pm; edited 4 times in total |
|
| Back to top |
|
|
thombiz
Joined: 25 Jun 2007
Posts: 799
Location: Corpus Christi
|
| Posted: Mon Oct 08, 2018 11:19 am Post subject: |
|
|
Page 7 - Replacing a Sail Panel
You will have quite a few pieces of thread remaining in the seam. I use a pair of forceps with the lock dogs ground off to remove these. Works great.
| Description: |
|
| Filesize: |
92.97 KB |
| Viewed: |
20179 Time(s) |

|
Last edited by thombiz on Mon Oct 08, 2018 4:00 pm; edited 2 times in total |
|
| Back to top |
|
|
thombiz
Joined: 25 Jun 2007
Posts: 799
Location: Corpus Christi
|
| Posted: Mon Oct 08, 2018 11:20 am Post subject: |
|
|
Page 8 - Replacing a Sail Panel
With the straggler pieces of thread removed from the front side of the sail, flip the sail over so the back side is up and remove any stragglers which remain on the back side.
Next, you will need to pull the fabric which covers the back side of the batten pocket free from the monofilm. See next pic. Gently peel up the lower edge of the upper batten pocket for the length of the panel. I usually use either my finger nails, or a large seam ripper tip, or a very small screw driver to gently get it started, then I run my fingers into the open area underneath the cover fabric and slide my finger along, pulling the fabric of the batten pocket cover free from the monofilm as I go.
Lift the batten pocket cover from leading edge to trailing edge of the panel to be replaced. DO NOT pull loose the batten pocket cover from the front side of the sail if you plan to put the new panel in on the back side of the sail. Do the same at the lower batten pocket.
| Description: |
|
| Filesize: |
100.25 KB |
| Viewed: |
20170 Time(s) |

|
| Description: |
|
| Filesize: |
101.62 KB |
| Viewed: |
20170 Time(s) |

|
Last edited by thombiz on Mon Oct 08, 2018 12:10 pm; edited 3 times in total |
|
| Back to top |
|
|
thombiz
Joined: 25 Jun 2007
Posts: 799
Location: Corpus Christi
|
| Posted: Mon Oct 08, 2018 11:21 am Post subject: |
|
|
Page 10 - Replacing a Sail Panel
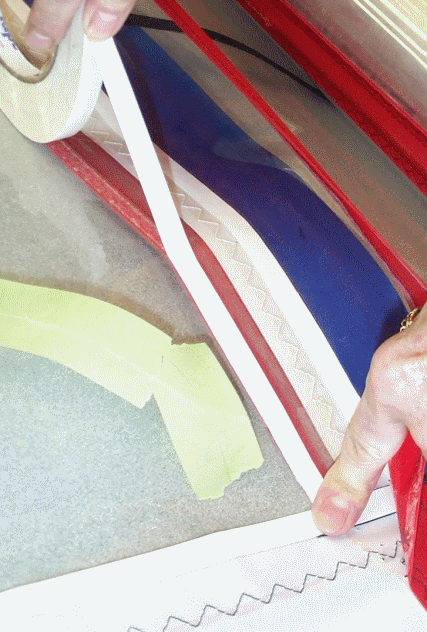
The manufacturer uses insignia cloth tape to cover some seams. Insignia cloth is a polyester cloth with an adhesive on one side. It makes a nice looking seam cover, and it protects the seam tape from early UV damage. You will need to remove the insignia cloth tape covering the seams at the leading and trailing edge of the panel. Start by using your seam ripper to cut a few of the threads hidden under the batten pocket cover. Then I use the seam ripper to cut the insignia cloth tape. Then I lift the edge and peel up the insignia cloth tape from one end to the other. And I stick the tape down somewhere on a clean panel because it will be reused to cover the seam at the new panel.
[img][/img]
| Description: |
|
| Filesize: |
88.6 KB |
| Viewed: |
20150 Time(s) |

|
| Description: |
|
| Filesize: |
71.23 KB |
| Viewed: |
20150 Time(s) |
|
| Description: |
|
| Filesize: |
86.23 KB |
| Viewed: |
20150 Time(s) |
|
| Description: |
|
| Filesize: |
125.41 KB |
| Viewed: |
20150 Time(s) |

|
Last edited by thombiz on Mon Oct 08, 2018 1:07 pm; edited 13 times in total |
|
| Back to top |
|
|
thombiz
Joined: 25 Jun 2007
Posts: 799
Location: Corpus Christi
|
| Posted: Mon Oct 08, 2018 11:21 am Post subject: |
|
|
Page 11 - Replacing a Sail Panel
You now should have polyester film surface along all perimeter edges of the damaged panel. Use Super-Tack seamstick tape the same width as the seam you just exposed, leaving the paper cover on, carefully stick a strip over where you just removed the insignia cloth of the leading and trailing edge seams, then lift the batten pocket cover and put a strip of seamstick tape along the upper and lower edges where the batten pocket cover was stuck down. Other Sail Brands may use different seam widths. Sailworks just happens to use ½ on this sail. Most other brands us 5/8.Looking thru the monofilm, align the edge of the seamstick tape with the edges of the batten pocket. You now should have the entire perimeter of the damaged panel taped with seamstick. Next put seamstick where you lifted the insignia cloth at the flutter batten.
| Description: |
|
| Filesize: |
117.02 KB |
| Viewed: |
20148 Time(s) |
|
| Description: |
|
| Filesize: |
101.24 KB |
| Viewed: |
20148 Time(s) |

|
Last edited by thombiz on Mon Oct 08, 2018 1:25 pm; edited 3 times in total |
|
| Back to top |
|
|
|
|
You cannot post new topics in this forum
You cannot reply to topics in this forum
You cannot edit your posts in this forum
You cannot delete your posts in this forum
You cannot vote in polls in this forum
You can attach files in this forum
You can download files in this forum
|
|
|

